Pit Firing
The primitive process of pit firing intrigues me. That a vessel can be decorated by the smoke and fumes generated in an everyday campfire is amazing. I love how unpredictable and spontaneous the surface is with flashes of random colors and textures.
Contemporary potters have many advantages over the ancient potters for whom pit firing was the only "firing" available. With an electric kiln, I am able to bisque fire pieces before pit firing, thus ensuring consistent hardness in the clay and saving me many breakage headaches. Also, there are many pure chemicals and minerals available from pottery suppliers which can be used to gain some predictability in coloring. For instance, Copper Carbonate, when sprinkled around pots, will give flashes of deep red to maroon and shades of pink. In the July/August issue of Pottery Making Illustrated, there is a chart that outlines some sources of color in barrel firing (very similar to pit firing) and their results (pg. 26).
There are as many different ways to pit fire as there are potters, but mine is uniquely adapted to my present circumstances. I fire in my In-law's backyard fire pit. It has a cement bottom and fairly large stones around the edges. My In-laws live up in the hills and well away from neighbors so we haven't received any complaints for the fires yet (although we did have one concerned neighbor call worried that the house was on fire when he saw the smoke wafting up from behind it).
In order to transport my pots safely there, I first wrap them in individual bundles at home. The bundles are composed of copper scrubbing pads, banana peels, and newspaper. After painting my vessels with a half-water-half-ferric chloride mixture (Warning: ferric chloride makes beautiful colors, but must be handled with extreme care. Please read all warning labels and use proper protective materials when working with this substance) I place banana peels in strategic places on the pot and then tape or wrap cut-up copper pads on top of that. The messy pot is then wrapped in newspaper, which has the double advantage of cushioning the pot for the journey and increasing flammability around the pot in the fire.
At the firing pit, I first lay at least an inch of wood chips. On top of the wood chips is a fine layer of straw or hay that serves as a bed for the pots. A liberal sprinkling of rock salt, copper carbonate, and red iron oxide is given to the hay. The pots are placed with the largest ones in the middle and the smaller ones radiating out in a circle. I rarely stack vessels unless lack of space forces me to. I scatter more straw/hay on top of and filling in gaps between vessels and then sprinkle more of the minerals on top . From this, I begin to place firewood around the pieces, with small kindling first and then larger logs around the outside and stacked in the middle. Newspaper strips are tucked in between logs to get the fire going. The whole thing gets a very liberal spraying of fire starter, and then I drop in some lit matches. Then I just let the fire burn until dead--which usually ends up being a couple of hours.
After the fire has burned itself out, I use metal tongs to pull out the sometimes still hot pots and place them on the stones around the pit to cool. Once they are cool enough to touch, I use an old rag to wipe of the ashes and then wrap them in newspaper again and box them up for the trip home.
To finish the pieces, I thoroughly clean off the remaining grime from the fire with a lightly damp rag. I use Future floor finish diluted half-and-half with water to seal and polish the vessels. It is an acrylic finish, so it serves to seal and make the vessels more durable, as well as giving a slight sheen to the surface.
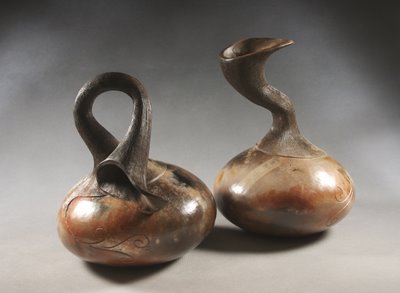
Above and Below are pictures of vessels from the last pit firing on 8/3/06


No comments:
Post a Comment